Thursday, June 05, 2008

Leaving Seattle


We loaded the boat at Shilshole this afternoon in the rain. This was the first time we had used the hoist to pull the mast and load the boat onto the trailer and we breathed a distinct sigh of relief when this was done without dropping or breaking anything!

We left Seattle about 4:00PM. Frank Metheny called about Snoqualmie Pass that I-90 was closed east of Ellensburg due to smoke from a brush fire. We have parked in Ellensburg, behind a motel, for the night.

Yesterday, next to our moorage in Lake Union, some young people were filming romantic scenes of a gentleman and a lady with a parasol in a beautiful, wood row boat. Then, the lady jumped up, stripped off her gown and panties and jumped into the water. I think she was to appear later as a mermaid as part of a "home video".

We should get home late tomorrow or the next day if all goes well. Memorable visits with old and new friends and lots of great food.

Our boat continues to attract attention and approval which is gratifying. "Pretty boat!", "What is it?". "Nice work.", etc. etc.

in the water now


Milestone #1: We left the driveway in Bozeman with "Duck" in tow (5,000 pounds) on Tuesday and arrived at the coast on Wednesday. The van pulled the heavy load at about 60 mph slowing down to 35 mph over the steep passes. We got 10-12 mpg.

Milestone #2: We launched at Oak Harbor on Thursday, put the mast in, and tightened the rigging. It floats!

Milestone #3: Friday morning we put on the sails and sailed for 6 hours in 6-14 knots of wind. It sails!

Milestone #4: Saturday we motored for about 6 hours from Oak Harbor to Anacortes. The 2 HP Honda pushed the boat at nearly 5 knots wide open and 4 knots at 2/3 throttle. It runs for 1 to 1 1/2 hours on about a liter of gas. Very satisfactory.

A motivation for working on this Etchells conversion project was that it was "a pretty boat".

This week at Oak Harbor was "Race Week". About 100 racing sailboats had converged for a week of racing and the harbor was full of new, light weight boats with carbon fiber masts, and aggressive racing crews.

We were overwhelmed by the barrage of attention and admiration from the racing sailors. People shouting from their boat "Pretty boat. What is it?" People on the dock inspected the boat from different angles and voiced their appreciation. It was almost funny.

So, more than you may want to know about our little project.

It is going well and we hope to use the boat for a few weeks.

lotsa little boat pieces


The last few days I have been working on trim and details inside the boat. The pieces have various dimensions and angles so you measure and write down notes about where the part fits on the boat, go to the shop and make a part, return to the boat to try it, then the shop to cut some off, etc. The port and starboard sides look like mirror images of each other but there are small differences so the part on one side is 12 and 3/4 inches and the similar part on the other side is 12 and 3/8 inches.

I have started wiring running lights, a depth sounder, a switch panel, DC outlets, and a car radio and speakers.

The trailer lights and brakes and the brake controller are all wired and waiting for a test. There are new tires on the wheels and everything has been painted. I attached an old wood box to the trailer to store the grease gun, blocks, tie-downs, etc.

The spray hood is 90% finished and I am trying a white tarp from the hardware store as a boat cover.

We are looking at two options for cockpit cushions.

I have filed 20 sail slugs so they fit the 1/8" slot in the Etchells mast. I hammered the old entry mouth for the bolt rope closed and cut a gate near the boom for threading the slugs. I built an aluminum pedestal with two jam cleats near the base of the mast to hold the jib and main halyard.

The list of "things to do" seems to grow faster than I would wish. It is not clear that we will be ready to haul it to Seattle to launch before July. Keep tuned.

Brakes and Motor


Work on the Etchells slowed a lot after the New Year. January weather was too cold. In February and early March we trailed the F-24 to the Florida Keys and for the last month we were in Turkey. I started working again yesterday.

The trailer once had hydraulic surge brakes but the master cylinder and brake lines were gone and the backing plates, shoes, and wheel cylinders were frozen with rust. I spent several days this spring trying to identify the brake parts so I could search for replacements. I sent photos to several boat trailer supply houses, manufacturers, made numerous phone calls and visited everyplace near Bozeman that worked on trailers or sold parts. I found new backing plates but could not identify the actuator.

I could modify the tongue and weld on a new actuator, plumb the hydraulics, and replace the backing plate assemblies for about $600 and a lot of work. Changing the brake system to electric brakes would cost less than $300. Since this trailer does not have to go into the water I went with the electric system. I ordered the parts before we left for Turkey and they were here when we got home three days ago. I ordered all new bearings and seals on general principles.

I have mounted the new backing plate assemblies, cleaned the rusty brake drums, painted them and had the drums turned at Checker for $10 each. I installed all new bearings and seals; good thing, three of the four old bearings showed some spall! I greased everything up and put it together leaving the axes nuts one notch loose and installed Bearing Buddies.

Like most boat trailers, the tires show plenty of tread but the rubber is cracked from sun and old age. They were 7.00x15, 8 ply and one had a slow leak. I cleaned the rims today and will paint them and get two new tires next week for about $85 each. Good insurance I figure.

I found an old wood box in the crawl space and may install it on the tongue as shown and use it to store tie-down straps, blocks of wood, a jack, etc.

After the brakes, the motor and its mounting were the remaining big, unknowns. This took a leap ahead on Friday when Jonathan found a 2 hp Honda motor for sale in Olympia. It had a long shaft and clutch and reportedly had seen little use. He drove there Friday night, checked it out, bought it, and brought it back to Portland. Yesterday he wrapped it up and it should be on the way to Bozeman via UPS. Thanks Jonathan!

I am thinking about building an outboard well and the light weight of the Honda should be an asset. I think it should push the boat 3 or 4 knots in flat water. I am hoping that if there is any wind at all we will be sailing. Time will tell.

Monday, January 29, 2007

sail inventory


During this cold, sunny afternoon we looked at some bags of sails I had not opened yet. We rolled them out on the driveway, inspected them and took a few measurements to help me with the rigging.

It turned out there were three main sails and four jibs.� I had traded two spinnakers for an old outboard motor so I only have two spinnakers left.� All the sails were in good or better condition and one of the mains had reef points just like George said. This is the one pictured and the one we will use.

I mounted the boom and temporarily hooked up the topping lift and rove the main sheet and it all looks like it will all work.� I hooked up the forestay which seems too long. I have some engineering to do on the adjustable backstay which I am changing from the original.

Yesterday I removed the spinnaker pole lift which I do not plan to use and re-arranged the main and jib halyards to exit in the cabin.� I have a little different idea about how to do the halyards.

almost


The parts I have been working the past week are mostly finished and in the boat.

The oak keelson got some Watco oil and was bedded and bolted down as shown in the first picture.

Yesterday I cut and installed about 50 mahogany plugs into the floor grate.� This morning I sanded these flush and gave a final coat or Watco to the floor grates.

I sanded the pedestal after the final layer of fiberglass tape and sprayed a coat of primer.� (The fiberglass tape was the end of a roll I inherited from Jonathan's boat project last spring.)� I made a little teak platform for the top of the pedestal, bedded it, and bolted the main sheet block and jam cleat in place.

I thought about bedding the coamings but discovered that I had bought two tubes of silicone caulk that was out of date so that will have to wait.

I dug an old�spray hood out of the garage attic.� It belonged to another boat and was never used. Unfortunately we hosted a pack rat in our garage last year and the rat chewed two holes big enough to put your hand through, in the cover. Other than the holes,the cover is in new condition and might fit the Etchells�boat with a few modifications.

We will think about whether the spray hood is worth the clutter.

From the garage I dug out a Sunbrella boom tent and two Dacron monkey hammocks that came with the Etchells and Marjorie threw these into the washing machine and we will see if these might be of some use on the daysailer.

Wednesday, January 10, 2007

Recycle Floor Grates


The original Etchells had a mahogany floor grate that was 6 feet long and over 3 feet wide. The grate appeared to have been sanded and varnished several times and was in a distressed condition. There was some rot in the floors but the wood in the planks seemed worth saving. My new cockpit needed a floor about 9 feet long and 2 feet wide. I wanted to drop the height of the floor an inch or two to gain a little space.

To disassemble the old floor grate I removed the wood plugs that had not fallen out and about 50 screws. Most of the screws were old-style, bronze, wood screws with a shallow, slotted head and about half of them came out pretty easily. There were a few iron screws and nails too.

I spent much of yesterday cleaning the planks using a power plane, a disc sander and finally an orbital sander. I put a coat of Watco on the old, dry wood and began to figure out how to reconfigure the floor grate.

The last picture shows what I ended up with today. All the material was re-used excepting a few tiny scraps!

Much of my enjoyment of this project is figuring out how to re-use parts from the original boat.

The original Etchells had a control console in the center of the cockpit floor for sheeting the main and about a dozen other lines. I am simplifying the rigging but still wanted to sheet the main to the center of the cockpit. I cut two pieces from the original fiberglass console and will glass them together to make a "mini" console. This console is roughed out and will be positioned pretty much as shown in the pictures.

Forty degrees and sun made today wonderful for working on the boat.
Later this week below zero temperatures are predicted as a storm moves in.

Coamings


We took a vacation from working on the boat for about two weeks during Christmas, with the exception of an important day spent putting up the mast.

On Wednesday afternoon I sanded and varnished the tiller and polished the bronze with a buffer. On Thursday I put the coamings on the saw horses. They had been roughed out several weeks ago with a Skil saw with a dull blade and the edges were rough and burnt. Marjorie had put on a sealing coat of varnish while we were in the warehouse.

I planed the edges, put a 1/4 " radius on the sharp corners with the router, sanded, and drilled for the mounting screws. By Friday afternoon they were dry-fit into the boat and looked good.

The curved, laminated coaming at the rear of the cockpit was still a source or worry. It is curved and both ends must be cut with compound angles to fit between the coamings. Lots of ways to go wrong. Well, I made a bunch of measurements and cut the angles on some pieces of scrap to test them in the boat. To run the curved beam through the table saw I made some guides to hold the free end which was a foot and a half up in the air.

If I ruined this piece I would have to go to Belgrade for some more mahogany, rip it into thin planks, epoxy the planks together, etc. This would take a couple of days of work and $50 materials.

Well, sometimes you are lucky. The curved piece fit into it's place just fine. This is a great relief! The Harken track fits on top as per plan.

You can't tell from the picture, but the weather today has temperatures below freezing with gust 20 mph winds and blowing snow. The plastic cover on the boat flaps vigorously in the wind but has not torn itself up.

Thursday, January 04, 2007

mast raising


On Wednesday, after Christmas, it seemed a slow day. The weather was dry and above freezing so in the afternoon we decided to attempt to raise and install the mast in the Etchells, in the driveway.

The spreaders are about 20 feet above the base of the mast and the mast hole in the cabin is about 9 feet above the ground so the "sky hook" needed to be at least 30 feet above the ground. I thought about using the roof of our house but it is only 23 feet above the ground.

I made a "gin pole" using an aluminum extension ladder which was about 17 feet long. I had a spinnaker pole 10 feet long and the garage roof was 9 feet above the driveway. By hinging the foot of the ladder to the roof of the garage, lashing it in an extended configuration, and then lashing the spinnaker pole to the top of the ladder we achieved a gin pole whose top was over 31 feet above the driveway. We rigged three rope guys and a lifting rope through a snatch block at the head of the pole and erected the pole.

The mast weighs less than 100 pounds so I tested the rig with my weight (210#) and it didn't break, bend, or bow, so I figured we had a factor of safety of 2 or more.

The whole family was in on this experiment. Jonathan and Christopher balanced the mast while Marjorie and I pulled on the hoisting rope. When the mast is hoisted, ready to slip into the mast step, the top of the mast is about 50 feet off the ground and that, is impressive!

We were just about high enough to lower the mast through the hole in the cabin top when I noticed the upper section of the ladder was taking on a distinct bowed shape. We rested the foot of the mast on the cabin to reduce the load on the gin pole. Christopher suggested we change the angle of our lifting rope to put it directly under the tip of the pole rather than to the side. This helped and soon we had lowered the mast in the boat and bolted it to the keel. We attached a few shrouds, put on the boat cover and since it was 6:00PM and dark, we called it a day and put on the boat cover.

That night it snowed about 12 inches and the last picture was taken the next morning.

It was exciting to have the mast in place. It was starting to look like a "real boat" and I would now be able to figure out some of the rigging details.

Work on the boat will slow down a lot due to the winter weather and to other obligations during Christmas, and beyond.

going home


We got up at 5:30AM and fixed breakfast and a Cuppachino and made half a Thermos of coffee. We drove to the warehouse a little before 7:00AM figuring this is the earliest the taping guys would be there. After the generosity of the Millers, the last thing I want to do is delay their project. We had cleaned the warehouse on Sunday so we sat in the cockpit of the boat and had a cup of coffee, waiting for it to get light outside. About 7:30 we opened the garage door, hooked the trailer up to the van and pulled it out into the cold morning.

Marjorie had suggested that we take the removable tail lights off the F-24 trimaran, and use them to "be legal" on the ride home with the Etchells. A brilliant idea, which I implemented. The ride home was uneventful even though we were driving on hard ice some of the time. We sent slow and got the boat spotted in our driveway at about sunrise. It was afternoon before I started rigging an enclosure. I had thought about building a different temporary enclosure but reverted to the plastic sheet tarp draped over the conduit hoops that I used during October and early November.

We have had a few comments from email correspondents in other parts of the country that we were either pathologically zealous or at least diligent and brave for working on this boat during cold weather. I will assure you that even during near-zero weather, like today, if the sky is clear, the sun warms you and it is "not that bad". I did have a moment at 4:00PM when I removed my gloves to tie some knots and my fingers refused to work. Well, that was a sign that the "sun was over the yard arm" so after getting the cover on the Etchells, I quit.

This Sunday morning both Marjorie and I were awake at 5:00AM having fallen into bed early due to a long day Saturday, working on the Etchells. I said "Lets get up and start early, I have a plan." I figured if we put another coat of paint on the boat's cockpit on early Sunday, then left it in the heated space until early Monday morning, it would dry. Some sheetrock tapers might come in Monday morning to fix some cracks and we have to be out of there.

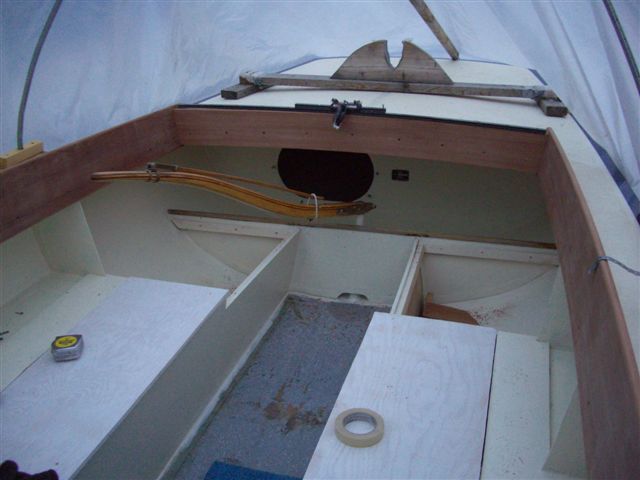
We were at the warehouse an hour before the sun showed itself. The temperature was a couple of degrees below zero! I sanded the inside while Marjorie read the paper. Then she vacuumed in inside and wiped down the interior with solvent while I put primer on plywood that will be the "seats" and "bunks". Then I mixed the single-part polyurethane paint, the same off-white as the deck, and began painting about 10:30 AM. Marjorie went out to Costco, did some shopping, and brought us back a sandwich about 12:30, just when I was finished painting, AND ran out of paint!d We had lunch and rested in our camping chairs which we brought in, almost a month ago, when we moved into this space!

After lunch, we loaded tools, paint, lumber, table, saw horses, etc. etc. into the van. We had hauled a lot of stuff to the warehouse. Marjorie commented that we had used most of it.

We got home about 3:00PM to a glorious, sunny, Montana, winter day. The sun was very welcome as house had cooled to around 60 degrees because we were not home, we had not kept a fire going during the cold, cloudy weather. I put on some clean clothes as I was "heavy with sawdust and paint", and took a short nap followed by a shot of espresso.

I ran the snow blower to remove about 3-4 inches of snow from the driveway. I ran the snowblower out into the yard so I could stand a chance of getting the Etchells turned around and backed into her place. alongside the garage.

We returned to the warehouse near sunset and loaded the last of our tools and materials and swept, and dust-mopped the space, hoping to leave it at least as clean or better than we found it. The boat is ready for us to hook up our van to the trailer and bring it home.

Somewhat worrisome is the fact that last night as we tried to drive the van from the warehouse area onto Frontage road, the entry road was covered with a glaze of ice an inch thick, and the van could not get enough traction to pull itself out onto the highway. We are thinking, "Which is the most level route from the warehouse to our house?"

Well, yesterday we screwed and glued pieces of plywood and 1X2's together and today we continued more of the same. By the time Prairie Home Companion came on the radio, 4 PM, we were ready to do some painting.

We missed most of the of the PHC program as during the first part we were painting deck-colored paint on the inside of the hull and later we painted white primer on the bare plywood that makes seats. Our friend George Renner lent us the white primer from his stock of supplies. It is almost as good as having a West Marine in Bozeman.

We didn't get home until about 7:00PM and that feels like a long day for an "optional project" that is supposed to be "fun"! Oh well, the boat is inspiring so we keep going. Dinner will be re-heated spaghetti.

I think that tomorrow we will move the boat out of the heated warehouse we have enjoyed and will park it in the driveway.The low temperature tomorrow is predicted to be around 4 degrees F. No painting outside is scheduled this week, but the Christmas tree is waiting to be decorated.

storage under cuddy cabin


Today, Friday, we continued to work on the storage bins under the cuddy cabin. By this afternoon the frames built and in place and Marjorie applied fiberglass tape attaching the frames to the hull.

We are scheduled to leave our heated warehouse this Sunday. I had hoped to do some more painting of the inside before moving the boat to our cold driveway but time is running out.

On a typical day I wake up early and imagine that I will finish Task A, Task B, and Task C during that day. At the end of the day we may have finished Task A.

The work is mostly fun and challenging. It is special to see something you have only thought about, take shape. We have worked on this project much of the past 11 weeks.

Thursday, December 14, 2006

More cockpit


On Tuesday we removed the roughed in cockpit and I took the disc sander to the inside of the hull. There were lots of epoxy drools from the repeated coring, filling, glassing, and smoothing of the deck and house and these were ground smooth. Areas where the cockpit bulkheads and frames would be glassed to the hull were sanded to get to the original fiberglass hull, hoping for a strong bond.

We put the cockpit framing back in the hull and I mixed batches of epoxy thickened with West 410 and Marjorie made fillets where the plywood met the hull.

I planed and sanded the curved, laminated, mahogany coaming. It looks pretty good. There were two places where the thin planks had not been entirely squeezed together. I cleaned these "cavities", filled them with epoxy, and clamped them.

On Wednesday Marjorie applied 3 inch fiberglass tape where plywood met the hull. I worked on designing and building storage under the cuddy cabin.
It is exciting to see our ideas take shape

Tuesday, December 12, 2006

Cockpit


I started on the cockpit seats Friday December 8. There have been a number of informal sketches of the cockpit on scrap paper and restaurant napkins but I basically make it up as I go.

The first step was to figure out where to start and what was level, etc. I used a carpenter's level and also the cheap laser level from Home Depot that I bought to scribe the waterline on the outside of the hull. I set up a 2X4 frame with C-clamps and sheetrock screws and tweaked this frame and measured, measured, measured.....for about a day. I discovered several departures from "symmetry" of up to half an inch both in my work and in the original factory built parts of the boat. I eventually had reference 2x4's that established the location of the proposed seats that was "mostly level, mostly centered, pretty symmetrical", etc.

I measured and cut the bulkheads and held them temporarily in place with a few gobs of Bondo. Then I measured the kick panels, shelves, and seats and cut them out of 1/2 inch, certified plywood from Home Depot. I used 1x2 framing that was glued to the plywood and by this evening, after about three days work, the seats are roughed in as the last picture shows. The next step is to remove the seat "modules" and clean up the inside of the hull with sanders and brushes. Then the seat modules will be set back into the hull and taped to the hull with fiberglass tape and epoxy.

Deck work


The first week of December was spent mostly on the deck. The sides of the cockpit were trimmed and filled to accept the coamings. We had put two coats of Interlux epoxy primer on the deck a couple of weeks earlier when we first moved into the heated space. I did some sanding and filling and put on the first coat of deck paint. It is an off-white with a touch of yellow or buff color.

I decided to make an aggressive non-skid and bought a 100 pound sack of number 30 sand for $7; I only needed a couple of pounds. I spent over a day masking off areas that would not receive non-skid. Then we put on a coat of deck paint and used a coffee can with holes punched in the bottom to spread sand on the wet paint. We put on a generous coat of sand that about covered the deck. My assumption was that the excess would easily sweep off and I would be left with a continuous, thin coating.

Well, the next day I found that most of the sand had stuck to the paint and the deck resembled a Zen sand garden. Fortunately, about half a day spent with a wire brush and vacuum cleaner reduced the sand to a density we liked and I applied another coat of paint. The next day I removed the masking tape and applied the last coat of deck paint to the whole deck. The masking tape separating the deck paint from the blue hull was removed and the results are striking. The non-skid nicely masks some of the rough places in my deck finishing work.

The non-skid is rough and aggressive so should you want to lounge on the deck in your bikini, it had better be made of leather. Hmm.. interesting....but we don't do that. My thinking is that this boat is sailed from the cockpit where there will be comfortable seats. Since there are no lifelines, when you do venture on deck you will have good footing.

I stuck some cleats and handrails to the deck with tape to see how this was looking and was happy with the results.

Mahogany Tales


On November 7 we bought 4, 8 foot long mahogany planks an inch thick and about 9 inches wide at Belgrade. We spent about an hour in a below freezing warehouse sorting through about 50 boards to find the ones we bought, for about $100.

Two planks were planed to 3/4 inch thick for coamings along the sides of the cockpit. The rear of the cockpit needs a board an inch thick, about 5 feet long and bent about 3 inches in the middle. I yielded to "professional help" of a hardwood store that does millwork who was going to re-saw one of my mahogany boards into some 1/4 inch planks that I would then bend with epoxy and laminate into the curved plank I need. The thin planks would be ready the next day.

The hardwood guy said he would give the plank to a "trust fund hippy" who had a big band saw. Three days later I picked up the pieces. Our one inch plank got converted into three pitiful, rough pieces averaging 1/8 inch thick. They were split, cupped, and gouged and looked like scrap (notice the "s"?). I will use some of it for something, but had to start over getting material to make the curved, rear, cockpit coaming.... Enough Professional Help, back to "do it yourself".

The next day Marjorie and I cut a 5 foot board 5 1/2 inches wide out of the remaining plank. (It was supposed to be 6 1/2 inches wide but I measured wrong! Since there were no more big pieces of mahogany I changed my design slightly; it may be better!) We turned this plank on edge and ran it through table saw twice and now had two planks a little under half an inch thick.

These two planks plus an 1/4 inch piece from the mill were slathered with epoxy, wrapped around a curved form, and clamped. I ran out of pipe clamps and made some extra clamps using miscellaneous threaded stock that I had in the garage.

I knew the beam would spring back some when the clamps were removed but I was at a loss to know how much so I guessed at 3/4 inches extra bend which was 20-25% extra curvature. Two days later when I removed the clamps there was good news; the thing did not blow up, and the springback was close to what I had guessed. My luck had turned.

Thursday, November 30, 2006

Backdeck Beam


The first picture shows the 4x4 that was cut with big curves on Georges band saw. I dry fit it yesterday evening and today used Jonathan's curved plane to smooth out.

Tomorrow I will probably epoxy it in. I have worried about making this piece and am happy it seems done.

Thanks Jonathan about remembering that I had stored some of your tools including this useful antique.

I trimmed back the sides of the deck today to receive the combings. Shown in the picture with Marjorie is a scrap redwood plank that I temporarily put in to see how the combing angle was working.

I bought some mahogany boards on Monday to use for the combing. The mahogany plank will be wider.

Tuesday, November 28, 2006

Trailer


This afternoon we applied brushes, grinders, and a 3M gadget that you put in
a drill and managed to get most of the loose rust and paint off in about two
hours of dirty grinding. I than applied a coat of Rustoleum primer from
Home Depot and by 6:00PM it looked 98% better: see picture.


The picture shows some new lights I bought. Kenyon had them on sale for $29 for two lights on a stand with a spare bulb. Kenyon was sold out, but Simpkins Hallin matched the sale price. Marjorie encourages me to buy two lights and they are handy.

Bottom Paint


We put on some bottom point this afternoon and this is what it looked like at the end of the day. The bottom paint has copper particles in it and the paint dries in a minute. You can't go back and forth with the roller to smooth it out because the roller starts picking up the paint you just put on! You roll a couple of times, in the same direction, and that is it. The good part is that you can put on another coat in 10 minutes and hopefully cover the places you missed the first time. Funny stuff and, about twice the price of single malt Scotch!

The hull now has two coats of the final blue color. It looks beautiful to us even though the surface is not perfectly glossy.

Elliptical ports were recommended by Allan, Steve, and others so what you see is pieces of cardboard stuck to the house with tape to simulate this. What do your think? Looks pretty good to me!

Tomorrow I hope to clean some of the rust and scabby paint from the trailer and start to make it look better.

We don't know how much longer we will be able to use the heated warehouse lent by a neighbor so am trying to quickly do as much painting as we can. Next week the outside temperatures are expected to be around zero F.